ESP-IDF 测试框架
ESP32 测试框架概述
官方文档:
ESP32 项目使用了一套基于 pytest 的专门测试框架,主要包含以下组件:
- pytest-embedded: ESP32 专用的 pytest 插件
- pytest-embedded-idf: ESP-IDF 测试支持
- pytest-embedded-serial: 串口通信支持
- pytest-embedded-qemu: QEMU 模拟器支持
这套框架允许我们把单元测试/功能测试跟固件烧录、硬件运行日志结合起来,实现 自动化硬件测试 + QEMU 仿真测试。
2. 测试环境搭建
2.1 安装测试依赖
# 安装 pytest-embedded 相关包
pip install pytest pytest-embedded pytest-embedded-idf pytest-embedded-qemu pytest-embedded-serial

# 或者使用 ESP-IDF 的测试环境(推荐)
cd $IDF_PATH
pip install -r tools/requirements/requirements.txt
上面的可以执行这个 ESP-IDF 自带的命令
2.2 项目结构
your_project/
├── main/
│   └── main.c
├── CMakeLists.txt
├── pytest.ini                 # pytest 配置
└── test/test_hello_world.py   # 测试文件
3. 测试文件详解
3.1 基本导入和标记
import pytest
from pytest_embedded_idf.dut import IdfDut
from pytest_embedded_idf.utils import idf_parametrize
from pytest_embedded_qemu.app import QemuApp
from pytest_embedded_qemu.dut import QemuDut

# 标记说明:
# @pytest.mark.generic - 通用硬件测试
# @pytest.mark.host_test - 主机测试(不需要真实硬件)
# @pytest.mark.qemu - QEMU 模拟器测试
3.2 硬件测试函数分析
@pytest.mark.generic
@idf_parametrize('target', ['esp32', 'esp32c3'], indirect=['target'])
def test_hello_world(dut: IdfDut) -> None:
    # dut (Device Under Test) 是被测设备对象
    dut.expect('Hello world!')  # 期待串口输出特定内容
关键概念解释:
IdfDut: 代表一个 ESP32 设备,提供与设备交互的接口dut.expect(): 等待并验证串口输出idf_parametrize: 自动化指定测试目标(ESP32, ESP32-S3, ESP32-C3 等),甚至支持在 QEMU 中运行
4. 一般测试的内容
你在实际项目中常常会测试以下内容:
-
基础启动信息测试
- 固件能否正常运行
- 必须输出
"ESP-ROM:"、"Hello world!"等关键信息
-
功能性测试
- Wi-Fi 连接是否正常,能否获取 IP
- 传感器上电、读数是否合理
- 外设通信(UART/I2C/SPI)
-
回归/健壮性测试
- 固件 SHA256 校验(比如 ELF 与运行时校验是否一致)
- 内存使用是否超过阈值
- 稳定运行(reset 后还能初始化成功)
5. 硬件测试 vs QEMU 测试
硬件测试流程
- pytest 调用
idf.py flash→ 烧录代码 - 运行时通过串口抓取 log
- 使用
dut.expect("xxx")校验输出
QEMU 测试流程
- pytest 编译应用程序
- 启动 QEMU 进行模拟运行
- 捕获 console 输出验证
"Hello world!"等信息 - 优点:本地/CI 环境可跑,不依赖硬件
6. macOS 下使用 QEMU
在 macOS 上使用 QEMU,需要注意 ESP-IDF 使用的是 Espressif 定制版 QEMU。
一般方法如下:
6.1 使用 IDF 工具安装 QEMU(推荐)
ESP-IDF 提供了自动安装工具:
# Xtensa (esp32)
python $IDF_PATH/tools/idf_tools.py install qemu-xtensa

# RISC-V (esp32c3)
python $IDF_PATH/tools/idf_tools.py install qemu-riscv32

# 查看已安装的工具
python $IDF_PATH/tools/idf_tools.py list
安装完成后可以执行:
idf.py set-target esp32
idf.py build
idf.py qemu
此时会调用 qemu-system-xtensa 启动模拟器运行 hello_world。
6.2 如果没有预编译版本(需要手动编译)
有时 Espressif 不提供 macOS 的预编译 QEMU,此时需要手动编译:
git clone --recursive https://github.com/espressif/qemu.git
cd qemu

./configure --target-list=xtensa-softmmu,riscv32-softmmu --disable-docs --disable-tools
make -j$(sysctl -n hw.ncpu)

# 可执行文件位置:
ls build/qemu-system-xtensa build/qemu-system-riscv32
然后将其添加到 PATH:
export PATH=$PATH:/path/to/qemu/build
之后再次运行 idf.py qemu 即可。
6.3 在 pytest 中使用 QEMU
在有 test/test_hello_world.py 的项目中,可以直接运行:
pytest -s --embedded-services=qemu test/test_hello_world.py
pytest 会自动编译、调用 QEMU,并校验 DUT 输出。
6.4 QEMU 支持的芯片
目前 QEMU 仅支持:
esp32(Xtensa 架构)esp32c3(RISC-V 架构)
其他新型号(如 esp32s3、esp32c6)暂不支持。
7. 在 VS Code 使用
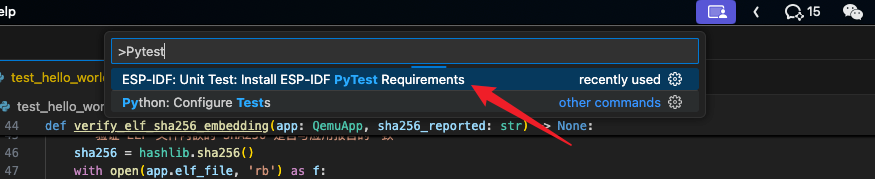
7.1 安装插件
- Python + Pylance(基础 Python 调试)
- pytest Testing 支持(通过 Python 插件自带)
- ESP-IDF Extension for VS Code(官方开发环境)
7.2 VSCode 配置 pytest
在 .vscode/settings.json 中加入:
{
  "python.testing.pytestEnabled": true,
  "python.testing.pytestArgs": [
    "test"
  ]
}
然后在左侧 Testing 面板中可以看到所有 pytest 发现的测试。
8. 运行测试
命令行方式
# 默认运行所有测试
pytest

# 运行指定测试文件
pytest test/test_hello_world.py

# 运行特定测试函数
pytest test/test_hello_world.py::test_hello_world

# 指定目标板子
pytest --target esp32 --port /dev/ttyUSB0
VS Code 方式
- 点击 Testing 面板中对应的测试用例运行
- 或右键测试函数 → "Run Test"
9. 高级技巧
- 自定义 fixture:提前做初始化(如连接 WiFi),在测试后清理。
- 超时处理:
dut.expect("xxx", timeout=60)防止死等。 - 多设备测试:一个 pytest 用例可操作多个 ESP32。
- 日志调试:捕获 log 到文件或 pytest 的 reporter 中。
10. CI 集成建议
- 在 GitHub Actions 或 GitLab CI 中跑 QEMU 测试,避免依赖硬件。
- 在本地实验室或自建 runner 节点跑 硬件测试。
11. 总结
- ESP32 的测试主要依赖
pytest-embedded系列插件。 - 它能 自动编译、烧录、捕获串口输出、断言功能,支持硬件和 QEMU 双模式。
- 在 macOS 上需要注意 QEMU 安装问题,推荐用
idf_tools.py install qemu-xtensa/qemu-riscv32,没有预编译包则需手动编译。 - 常见测试包括:Hello World 启动验证、Wi-Fi 连接性、传感器数值正确性、内存/性能稳定性。
通过这套自动化测试体系,你可以极大提升开发效率,让 ESP32 项目更可靠。
---

这样你就有了一个完整文档,里面包含 **pytest 框架介绍 + QEMU 安装与 macOS 下运行的详细步骤**。
要不要我再帮你加一份 **最小 demo 命令流(从 clone example → build → qemu 启动 → pytest 跑测试)**,让初学者直接复制粘贴就能跑成功?